Japan trip Part 3 - food and scenery


This third and final Japan trip recap is about the food and scenery from my recent visit. Eating delicious things is always a major part of my trips there and this time was no exception. The first stop was the famous Omoide Yokocho area in Shinjuku where old, narrow alleys are filled with the smell of yakitori stands grilling meat and vegetables over hot coals.

Here is a fancy sashimi platter at a Kawagoe izakaya that specializes in seafood. A friend mentioned that the beer must be watered down in places like these because they go down too easily.

A friend gave me this Niigata made Echigo IPA to try and it was very good. This is one of the most striking beer cans I've ever seen.

Kawagoe has one of Japan's earliest pioneering craft breweries called Coedo. Adjacent to their cafe-like taproom is a good sushi restaurant where you can order their beer from next door. The session IPA was a great match with the kaisen donburi. Because Kawagoe is known for it sweet potates, Coedo also makes a sweet potato ale that has a beautiful red color and medium-low fruity aroma. The potato flavor is very subtle and I'm not sure I could pick it out in a blind test.

In Nagatoro, you can take the ride in traditional riverboats through the peaceful waters surrounded by spectacular scenery. I didn't go on this trip but the time I did many years ago is still a vivid memory.

In the part 2 entry, I described the local kabuki presentation in Chichibu. In addition to the great theater and music, the food was some of the best on my entire trip. This little plate of soba looks a very simple, but it was made right there with fresh local sobako (buckwheat flour) and the flavor was magnificent. This tray also looks fairly ordinary, but the konnyaku and miso sauce were handmade by a man running a food booth who was happy to answer all of my questions about his process and ingredients. It was unlike any konnyaku I've had – far more flavor than the usual ones. The karaage was also incredibly delicious and paired perfectly with the local sake, which fully expressed Chichibu's pristine water.

Nikko is a popular destination, and I passed through just as the fall colors were ending. The sulfur smell of the natural hot springs was pleasant in the cool, quiet air. Nearby was a roadside stop with food windows, and an unusual fish name caught my eye: おしょろこま (oshorokoma). The man grilling them on the fire explained that it was a kind of iwana (char) from Hokkaido and the name came from the Ainu language. The flavor was very good – mild, fresh, and slightly sweet.

I received this Nagano-made beer from someone who had just visited that area. It was a well made kolsch-style ale, but the unusual feature was the explanation that water from Suwa Onsen (hot spring) was used to brew it. The interesting can illustration shows local attractions such as Suwa Lake, the local shrine and castle, and even the famous Onbashira Kiotoshi festival where people get on top of enormous logs and slide down a steep hill.

Another activity I mentioned in part 2 was the kabuki performance at the national theater in Tokyo. During one of the intermissions, I enjoyed a traditional makunouchi bento. This feast for the eyes was like a continuation of the beautiful staging and costumes of the play, and it was also delicious.

At the Bettara Ichi Festival in Tokyo's Nihonbashi, the featured food is bettara zuke, which is whole daikon pickled in koji. Between the Wakayama Shachu performances (described in Part 1), I walked around the dozens of vendors and tried almost all of the pickles available with the intention of buying some to take home. However, they seemed to all contain sugar and were too sweet for my taste. Perhaps I wanted to cut the lingering sweetness from all the pickle samples because I ended up at a shichimi booth and picked up a custom mixed bag. There were all kinds of festival-style foods available: dango, colorful chocolate covered bananas, and many others.

Not surprisingly, I couldn't get enough shin soba (fresh-flour soba). This double decker with tempura in Nagatoro was exquisite.

Yet another Japanese craft beer that was given to me which I had never heard of, tasted good, and came in an interesting can design.

Kamameshi is one of those nostalgic dishes for me, and unfortunately restaurants specializing in them seem to be disappearing. Happily there was a small restaurant in Asakusa away from the busy touristy area specializing in this cuisine. This mushroom kamameshi was delicious and satisfying. I also had my first-ever taste of hirezake there, which is charred fugu fin dropped in warm sake. It's not something I would look to order again.

More shin soba in Katashina with the people who make the Swiss horns from bent cedar that I described in Part 2. Local beer was ordinary but the soba was incredible.

This cat was napping under an ice cream window. It drew me in and I considered getting a cone until the person working there gave a disinterested look that was rather uninviting. Too bad, because the combination of a cute kitty and a friendly server would have been impossible to resist.

Growing hops at home


Centennial hops ready to harvest

Centennial hops ready to harvest

Hop plant in April

Hop plant in April

Growing hops at home is extraordinarily fun. The shoots emerge from the ground in early spring and grow very rapidly until the cones (flowers) are harvested in August and September. Commercially, they are grown on 18 foot trellis systems, but the bines (technically not vines) can grow much higher. There are well over 100 known varieties, each with unique characteristics of aroma, flavor, bitterness level, and degrees of susceptibility to disease and insects. The world's historical beer brewing regions of England, Germany, Belgium, and North America all have specific hop varieties which are important in defining beer styles. In the United States, Washington, Oregon, and Idaho are the biggest producing states, although more and more growers are appearing on the scene to meet the increasing demand of craft brewers trying to keep up with the skyrocketing popularity of hop-forward styles like India Pale Ale (IPA). There are three conventional ways hops are used in brewing: early in the boil to add bitterness, mid to late boil to add flavor, and post fermentation 'dry hopping' to add aroma. A good brewer will carefully choose hop varieties to complement the malt characteristics of the recipe and fine tune the process to create something delicious.

Hop plant in August on 12 foot bamboo trellis

Hop plant in August on 12 foot bamboo trellis

I've grown multiple varieties in the past, but this year I planted Centennial in the backyard. Centennial has a fairly substantial grapefruit and somewhat candy-like sweet aroma which I've heard compared to fruit loops cereal, along with medium bittering potential. One of the best known beers brewed with this hop is Bell's Two Hearted Ale. If you will be brewing with your own hops, it’s important to get your rhizomes from a source that can guarantee the variety. Many home brewing supply shops will sell them in early spring and they are also available by online order. I got my rhizome at the local nursery, which had a large selection of desirable varieties. Professional growers have told me that it takes three years for plants to reach maturity, where the root system is established and the harvest amount reaches full potential. I was pleasantly surprised that my first year plant produced more cones than I expected. Like anything, doing some research is recommended to ensure the plants are happy. My top two resources have been The Homebrewer's Garden (Joe Fisher and Dennis Fisher) and Homegrown Hops (David R. Beach). I also recommend Fresh Hops and Left Fields Hops for ordering online and for good information about hop growing.


Harvested August 28

Harvested August 28

This year I harvested on August 28. One of the most challenging and important skills involves learning how to judge peak ripeness. Pick too early and the hops are grassy, vegetal, and have low flavor and bittering qualities. Pick too late and skunky, oniony aromas appear. Fresh hops are fragile and need to be used (in the highly seasonal 'wet hop' or 'fresh hop' beers) or dried immediately. I used a door screen propped on some boxes with a fan blowing over them. If the humidity is low, they will dry in a few days, but I usually finish drying in a dehydrator at its lowest temperature setting for several hours. Then the hops are vacuum sealed and frozen, as warm temperature and oxygen are the top causes of deterioration. This year the final yield was 396 grams of dried hops. The amount needed for one batch of beer depends on the style, but I expect to get about 5 - 10 batches out of the 2016 harvest. The tricky part is not knowing the exact alpha acid content (bittering potential, which is given on commercially grown hops) so it takes some experimentation to dial in the recipe and process using homegrown hops.

I would encourage anyone interested to try growing your own hops. You can ask around to find out which varieties do well locally, although Cascade is one that is known to be very hardy. The best-known beer with Cascade hops is Sierra Nevada pale ale. For non-brewers, hops can be used to make tea or a hop pillow since they contain compounds that make you sleepy. And a little bit of online research will give you some ideas on how to use hops as a cooking ingredient. I also need to mention that hops are very toxic to dogs (and likely cats) and there are numerous accounts of sad endings from homebrewers who found this out too late. Please be careful. Never give beer to dogs.

Hops ready to dry

Hops ready to dry

Hops drying

Hops drying

Some recent photos


Portland Obon Festival 2016

Portland Obon Festival 2016

Jon Broida of Japanese Knife Imports in Beverly Hills

Jon Broida of Japanese Knife Imports in Beverly Hills

Celebrating National IPA Day

Celebrating National IPA Day

Cast iron seared padron peppers

Cast iron seared padron peppers

"Why shouldn't I sleep all day by the window?"

"Why shouldn't I sleep all day by the window?"

Phantom Carriage in Los Angeles

Phantom Carriage in Los Angeles

With Abe Lagrimas after a hard day's work in Los Angeles

With Abe Lagrimas after a hard day's work in Los Angeles

Finished product (no cat hair)

Finished product (no cat hair)

Homebrewed ESB

Homebrewed ESB

Very, very tempting

Very, very tempting

Homemade pizza

Homemade pizza

Playing with a ball like a dog

Playing with a ball like a dog

With great musician Mike Penny in Hollywood

With great musician Mike Penny in Hollywood

Excellent barrel-aged beer

Excellent barrel-aged beer

Natto making assistant, though he didn't do much

Natto making assistant, though he didn't do much

Waiting for popcorn to drop

Waiting for popcorn to drop

Making fermented dill pickles at home

Delicious home-fermented dill pickles

Delicious home-fermented dill pickles

As soon as I see pickling cucumbers at the farmers market, I happily make fermented dill pickles. These are delicious and so simple to make. Like anything homemade, you can adjust the ingredients and process to suit your taste. The two major variables are saltiness (based on brine strength) and sourness (depends on fermentation temperature and length). I fermented this batch for six days at a room temperature of 70 - 75° F and it is slightly tart. The salt level is medium-high to my palate so I might try a 4.5% brine next time. I left the seeds in the Serrano so there is a slight spiciness which is nice. The carrot is in there to supply calcium, which helps the pickle maintain a crisp texture. I use unrefined sea salt (contains calcium and magnesium) for the same reason. You can add any ingredient to flavor the brine, and tasting regularly will help you decide when it's done. Simply refrigerate the whole thing when the pickles taste good, and they will keep well for months and months.


Beautifully vibrant colors of fresh ingredients

Beautifully vibrant colors of fresh ingredients

Fermented dill pickles
550 grams pickling cucumbers
5% brine (1 Liter water, 50 grams sea salt)
fresh dill flowers
2 garlic cloves, whole
1 teaspoon whole peppercorn
1 Serrano pepper, sliced
1 carrot, sliced

Pack ingredients into 1.9 L Mason jar and then pour in brine until it covers everything. I could have probably fit another 150 grams of cucumbers into this jar (700 g total). Cover with a lid and ferment at room temperature, making sure to release any building pressure by loosening the lid. When the brine turns cloudy, the fermentation is fully active. You can start tasting it daily to check its progress. Place the whole jar into the fridge when you are happy with the level of sourness.

Interview: Jon Broida of Japanese Knife Imports answers my 6 questions


My current knives and accessories

My current knives and accessories

Modern double-bevel knives and serrated bread knife

Modern double-bevel knives and serrated bread knife

Over the years of being an avid home cook, my knowledge of knives has increased from very little to fairly substantial. I would read articles, watch cooking shows, ask questions in stores, and read online forums to collect information. One by one, higher-quality knives replaced my lower-quality ones, and as a result a new dilemma arose - sharpening and maintenance, where I was afraid of causing damage due to not knowing what I was doing. So for a few years I had my knives professionally sharpened, with highly variable results. Japanese knives were already my preference because of their sharpness and geometry as well as the sharpening method of water stones. I was even fortunate to receive my grandfather's old deba (pictured) which was rusted after years in storage but still in good condition. The reason I've turned into a knife geek is because of the tremendous pleasure I get from using these great tools in the kitchen, helping me work with more speed and control. It really makes cooking more fun.

Everything came into focus when I met my knife guru Jon Broida of Japanese Knife Imports in Los Angeles. Jon is passionate about Japanese knives and his company is extraordinary. He has spent many hours answering my questions and sharing his knowledge about the multiple facets of knives and sharpening. Jon's dedication in providing quality information is demonstrated by his invaluable free online video tutorials and product descriptions. Since learning about Japanese Knife Imports, I've purchased every single knife-related item there because their products and customer service are the best I've ever seen.

One of the most valuable things I have learned about Japanese knives relates to the ongoing relationship of the knife, sharpening supplies, and cook. These parts are all interconnected and there is no single correct approach. When I'm cooking, I pay attention to sharpness, durability, blade geometry, and how the knife handles certain tasks. Then I can consider these observations along with the type of metal of the knife while sharpening and adjust to suit my preferences. The next time I cook, I'm able to start the cycle again of deciding how the knife feels. The sharpening step could be done by someone else, and an excellent sharpener like Jon would be able to accommodate the cook's specific requests.

Traditional single-bevel knives (top three) and modern double-bevel knives (bottom two)

Traditional single-bevel knives (top three) and modern double-bevel knives (bottom two)

Another thing that changed my concept of Japanese knives was learning to use and sharpen traditional single-bevel knives. The three most common in this category are usuba for vegetables, deba for fish butchery, and yanagiba for slicing. Like so many things, studying the traditional roots gave me key insights into modern double-bevel Japanese knives. The single-bevel knives take more time and effort to learn, but the knives increasingly perform better as you acquire the skills to use them. Although not very versatile, they excel at doing what they were designed to do. I see a direct parallel in my own field, where a modern taiko player can deepen their own understanding and perspective by experiencing and studying the way their instruments were used in traditional settings.

Of course, the average cook does not need the assortment of knives and accessories in these photos. But for those who are looking to learn more, I asked Jon 6 questions about Japanese knives. I was thrilled and honored when he provided detailed answers to help us understand the most important points. I'm sure that Jon's responses below will illustrate his passion and dedication, and I highly recommend everyone visit his website and check out his sharpening and product videos.

Japanese Knife Imports website

Japanese Knife Imports youtube videos


1. How did you get into Japanese knives?
I guess it's kind of a long story of how I got into Japanese knives. I've always been fascinated with Japanese culture as a function of Japanese food being one of my favorites. This is actually what led me to get a degree in Asian studies when I attend college. As part of my studies, I spent a significant amount of time studying Japanese food. I even went as far as to write a thesis on a particular type of Japanese food-sukiyaki and shabu shabu. I think it's almost inevitable that if you study Japanese food you end up learning about Japanese knives, since skill and technique is such a large part of what makes Japanese food so great. While attending college, I started cooking professionally. This only amplified my interest in Japanese knives, and I soon found myself using primarily Japanese knives at work. Sometime later, I had an opportunity to cook in Japan. While training there, I asked my chef to teach me about sharpening and knife skills relating to the two Japanese knives. This was the beginning of my obsession. From there it grew and grew, and eventually became the business that I run today. Now, I have the opportunity to train in Japan the crowds and make these knives every year. Being able to see both the craftsmen side of the knife making process as well as the end-users using their knives and professional kitchens is something that I find extremely interesting.

2. What are some advantages of Japanese knives?
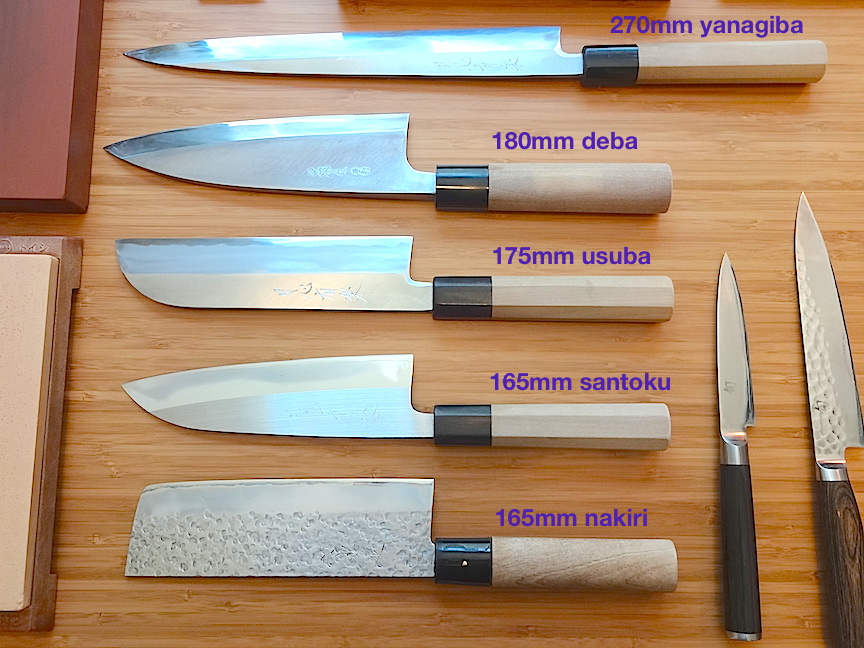
Japanese knives tend to be thinner and harder than their Western counterparts. There are some benefits to this, as well as some costs. Because Japanese knives tend to be a lot thinner, they move through food with much less resistance. For many people, this means that they feel sharper. However, being thinner also means that they lose out in structural stability a little bit, and are much more prone to chipping and similar damage. Being harder translates into Japanese knives holding their edge for a longer period of time and being more capable of holding acute angles. The acute angles translate into a generally sharper feeling. However, the trade-off for these things is that as the knives become harder, and as we sharpen them at more acute angles, they are more brittle, which contributes to the chipping problem previously mentioned. So, in some cases Japanese knives can be excellent, assuming that the knife skills, care, technique and use, and maintenance all come together to support the use of Japanese. One other interesting thing about Japanese knives is the way that the knife makers approach the heat treatment process. Japanese knives tend to be very finely grained, and the heat treatment is geared more towards grain fineness and edge retention than toughness and durability, which is in stark contrast to the kinds of heat treatment we see from knife makers in the Western world. Japanese single bevel knives have the benefit of being much more acute in terms of their overall angle, and having a unique cross-sectional geometry that provides a cutting experience unlike anything else. Most Japanese single bevel knives are designed for very specific tasks, and when used appropriately for those tasks, they are excellent. However, as general use knives, they are rather clumsy and difficult to use. For example, a deba is probably my favorite knife for breaking down fish, but it makes a very poor chef's knife.

3. Which knives do you recommend for someone new to Japanese knives?
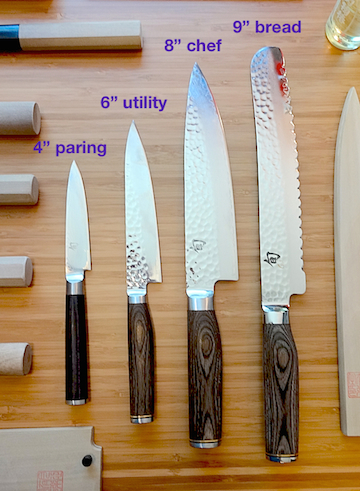
In general when people come to Japanese knives for the first time, it's my tendency to recommend to them something that is stainless and relatively tough and durable within the scheme of Japanese knives. There are many carbon steel Japanese knives (which means that they are prone to rusting and can be reactive with acidic foods), but in the beginning, as people are learning about how to use and care for Japanese knives, I prefer to minimize the kinds of things that they have to worry about so that they can focus just on cutting technique and basic sharpening. The type of handle that I might recommend depends predominantly on end-user personal preference. I personally tend to prefer Japanese style handled knives, but there are many who still prefer Western-style handled knives. Japanese-style handled lives tend to be lighter overall, and have a more forward heavy balance. Western-style handled knives tend to have a balance point more near to the poster and are generally have your overall. I will often recommend one big knife and one small knife. The big knife is more often than not a gyuto, while the smaller knife is generally a petty knife. Size wise, the larger knife will often run from 210 mm to 270 mm, while the smaller knife will often be around 150 mm. One of the brands that I recommend most often from the knives that we carry is the Gesshin Uraku Stainless Series. They are exactly what I have described above - lightweight, stainless, tough and durable, and come with a Japanese-style handle and a very Japanese-style profile. They also happen to be rather reasonably priced, and I think that it's important to start off with rather simple things and learn how to use them before moving on to higher and things. It's my experience that the more money you spend on things, the more that is required of you as an end-user, skill wise and experience wise, in order to use, care for, and get the most out of that item.

4. What other tools and accessories would you recommend?
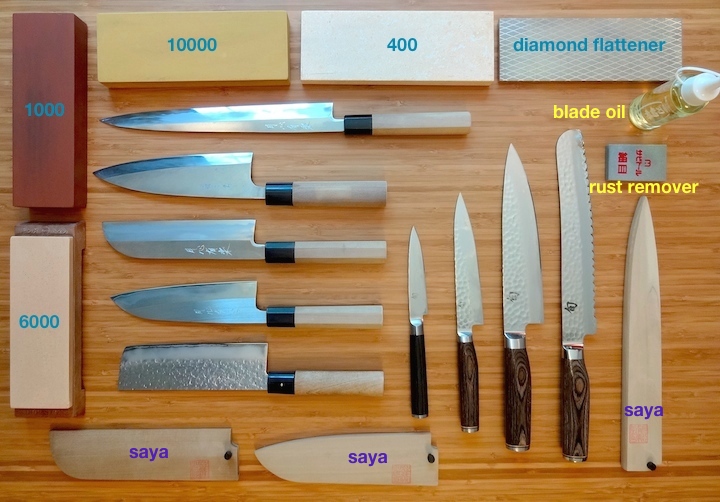
There are a number of other tools that might be helpful for people getting started with Japanese knives, but again, I like to keep things as simple as possible. I think that a big knife, small knife, and a very basic sharpening set up is probably everything that people need to begin with, and is often more than enough for people forever. In a complete sharpening set up one might have the following things:
    •    A good coarse stone (from about 220 grit to about 600 grit, although a little bit lower or little bit higher is not the end of the world) - this stone is used for major repairs, chips, extremely dull knives, thinning, etc.
    •    A good medium grit stone (from about 800 grit to about 2000 grit) - this stone is used for day to day sharpening, and can also be used for minor chips, minor repairs, and is often the place most people begin their sharpening routine.
    •    A good finishing stone (from about 3000 grit to about 8000) - this stone is used to give your edge a little bit more refinement, make the burr removal process a little bit easier, and improve the aesthetic finish of the edge.
•    Something to hold the stone in place - as simple as this sounds, this is actually very important. Although this doesn't need to be fancy, there are extremely fancy setups out there for this. This can also be as simple as a damp towel on the corner of your countertop, holding the stone in place ensuring that it's a stable base for you to sharpen on while you're moving a sharp object over it repeatedly. Fancier stone holder setups will also provide additional stone height, which can help create knuckle clearance. They may also offer some kind of solution for collecting the mess that occurs during sharpening, which makes cleanup easier at the end of the day.
    •    Something to keep your stone flat - as we use the stones, they tend to dish. Having a stone that does not have a flat surface makes it extremely difficult to maintain a consistent angle. Maintaining a consistent angle during sharpening is one of the most important things that we can do during sharpening. Keeping our stone surface flat is a large part of that. This, again, can be a rather expensive solution, or something almost entirely free. For example, I use a diamond flattening plate to keep my stones flat. They run about $65. On the flipside, one can use the sidewalk in a pinch, or wet/dry sandpaper inverted so that the grit is facing up. With the sandpaper laid down on a flat surface, and the grid facing up, one can rub the surface of the stone on the sandpaper to flatten the surface of the stone. If one has carbon steel knives, a rust eraser and camellia oil might also be helpful.

5. What are some common mistakes people make with Japanese knives?
I think there are two main areas where common mistakes occur - knife skills and sharpening problems. The knife skills required when using Japanese knives differ slightly from those used with German knives or other Western knives. Because the knives are so much thinner and harder, the rocking motion that is often taught tends to actually cause damage to Japanese knives. We use a thrust cutting motion that pulls the entire edge of the blade off the cutting board during each cut, which minimizes lateral force exerted against the edge. The main causes of damaged Japanese knives are as follows: hitting extremely hard things, hitting things with excessive force, and lateral force exerted against the edge. The knife skills that we use with Japanese knives try to minimize these things. With regard to sharpening, the biggest mistakes that I often see are not forming a burr, not getting rid of the burr once it has been formed, or forming an inconsistent burr over the length of the knife, causing the profile to change over time. Carbon steel knives can also often present problems for people. Not cleaning and drying them properly can cause the knife to rust. And, when working with acidic foods, not wiping off the blade periodically will result in both the blade and food oxidizing significantly, causing color, taste, and smell changes to the food, and rapid patina development on the knife.

6. How can people learn more about Japanese knives?
Nowadays, there are number of ways that people can learn about Japanese knives. There are a number of online forums that provide great resources. There are also books available in English as well as a number of videos on YouTube. For instance, we have about 3 1/2 hours of videos covering every topic that one might need to know about knife sharpening available on YouTube. Between all of these resources, it's rather easy to get out there, ask questions, and get a good idea of where you might want to start personally. Also, I try to make myself personally available to people as much as possible so that I can answer questions and help people get started with Japanese knives. As a function of our day-to-day business operations, we probably spend more time educating and teaching people than anything else.


About Jon

Jon Broida of Japanese Knife Imports

Jon Broida of Japanese Knife Imports

I graduated from Colorado College with a Bachelor’s in Asian Studies. About a year before I graduated, I decided that I wanted to give the restaurant business a shot. On my breaks from school, I interned at various fine dining restaurants in Los Angeles as a cook. Eventually, people started paying me to cook, and I stuck with it for a while. I have worked at some very highly regarded restaurants in the Los Angeles area, as well as in Japan and Italy (at a one star Michelin restaurant). While in Japan, I learned about Japanese kitchen knives... the different kinds, how to use them, and how to care for them. Up until that point, the best knife I had ever used was a MAC (which is worlds better than the german knives most cooks are using). My chef in Japan bought me a Masamoto knife (a carbon knife, the likes of which i never had used before). From that point I have never looked back. Over the years, I have tried many knives and waterstones, and experimented with many cutting and sharpening techniques. Now days, I continue to train... however, now I train with talented craftsmen and chefs in Japan every year. With sharpening, I have the opportunity to train with who I believe to be the best sharpeners in Japan. I also spend time with some of the top blacksmiths in both Sakai and Sanjo (as well as many other places).